SPROG DCC Diagnostics
When a SPROG does not do its job properly, the following set of checks will help find the problem and correct it.
Frequently, the issue is caused by the computer operating system (Windows, MacOS, Linux, etc.) being updated, often automatically.
We recommend that you stay up to date with the regular “Production” releases of JMRI, issued every 6 months.
Go to https://sprog.us.com/install/index.html to get the current version.
As most users have Windows computers, this starts with Windows;
for the other systems please read the relevant items later in this document.
These diagnostic tips apply to all models of the SPROG standalone devices,
SPROG II, SPROG IIv3, SPROG IIv4 and SPROG 3.
If you are using our Pi-SPROG One or Pi-SPROG 3 with a Raspberry Pi, see below for specific support for those models.
download the PDF version of this Diagnostics document for easy reference
These diagnostics take a step by step approach. Go through each step, and if it is successfully passed, then go on to the next step. It is tempting to just put a loco on a track and try to run it, but we need to step through from the beginning if that is not working.
This takes the following stages:
- Does the SPROG connect to the computer
- Does JMRI DecoderPro communicate with the SPROG
- Does the SPROG respond to basic commands such as Turn on Track Power
- Can a loco be Identified
- Can a loco be Programmed
- Can a loco be Run
Start at the beginning - don't be tempted to go straight to Power On!
A little bit about how DCC Programming works
The SPROG takes commands from DecoderPro and converts them into messages to the decoder.
To Read values from the decoder, the Track Power is automatically turned on briefly, and the message is sent.
The first step for the New Loco or Identify operation is to read CV 8 and get the value.
But it’s not quite so simple – the decoder cannot return a value, and so the actual sequence is
“CV 8, is the first bit (of the 8-bit word holding the value) a 1?”
The decoder can only reply “Yes” by pulsing the current drawn, or not reply, which is seen as a “No”.
Then the next message asks about the second bit, and so on up to the eighth bit.
Then DecoderPro calculates the value, and can identify the vendor ID.
This same process is followed for each of several CVs that are read to identify the decoder vendor, model, address of the loco and some other basic settings.
So, for this sequence to succeed, the computer has to talk to the SPROG, the SPROG has to connect to the track, which connects to the wheels, which connect to the decoder, which connects to its motor!
So to get started, you first need the software installed
Go to https://sprog.us.com/install/index.html to get the current version.
There you will find step by step instructions for the whole installation process to install Java if necessary,
and then the JMRI suite which includes DecoderPro and PanelPro.
A. Getting the SPROG and computer connected
Start with the SPROG powered off. Just remove the green plug to do so if it was already on.
Plug the SPROG power into the SPROG, and connect the USB cable, but do not connect that to the computer yet. Depending upon the SPROG model, the Power LED may not illuminate immediately, as it is program-controlled.
The other LED at the USB end will be on almost all the time, briefly flickering off when there is traffic on the USB between the computer and the SPROG. (On some old models, the sense is reversed, with the light mainly off, only briefly flickering on with USB activity).
On a Windows computer
- Open the Device Manager.
In Windows 10 or 11, right-click on the Windows icon in the bottom left of the screen and select Device Manager.
In Windows 7, right click "My Computer" on the Windows desktop and select Properties, then Device Manager. - Plug in the SPROG USB cable while watching the Device Manager screen.
You should see the entries change, and a new item show up. It may be named SPROG Programmer, or it may just show as a USB Serial Device- If it appears under “Other Devices”, drivers are needed
- If it appears under Ports, look for a yellow triangle warning
- If there is no triangle, note the COMxx port number
- If there is a triangle, drivers are needed
Older SPROG II models, and older versions of Windows will probably need drivers installed.
If drivers are needed, follow the appropriate instructions online at https://sprog.us.com/install/index.html and select the right version of SPROG and of Windows. Install the drivers, carefully following the instructions. You may need to install two sets of drivers, and so you will seem to do the same install sequence twice.
This is correct, to install the USB and the Serial connections.
Once the drivers are installed, repeat the step above and note the COM port number.
 - Start DecoderPro.
- Open Preferences, from the Edit menu
- In the “Connections” pane, ensure that the three entries are as shown here:
- System Manufacturer SPROG DCC
- System Connection SPROG
- Serial port COM6 (or whatever COM Port was identified above)
Click and reselect the COM Port, even if it looks correct.
- Click the Save button at the bottom left of the pane. You will usually be prompted to Restart DecoderPro to use these preferences.
On a Mac computer
- Plug in the USB cable
- Start DecoderPro.

- Open Preferences, from the DecoderPro menu
- In the “Connections” pane, ensure that the three entries are as shown here:
- System Manufacturer SPROG DCC
- System Connection SPROG
- Serial port cu.usbmodem.14101
(or very similar set of digits – NOT any “Bluetooth” entries!)
Click and reselect the Com Port, even if it looks correct.
- Click the Save button at the bottom left of the pane. You will usually be prompted to Restart DecoderPro to use these preferences.
- If you do not see a port identified as a “usbmodem”, but see a “usbserial” designator,
that is an older SPROG II, and you may need drivers installed.
Contact us at sprog@bbmgroup.com for more help. - If you do not see any similar identities, then look in the System Report.
From the Apple logo menu, select About This Mac and then click System Report …
There you should see the SPROG listed. If not, contact us at sprog@bbmgroup.com for more help.

On Linux
- Plug in the USB cable
- Start DecoderPro.
- Open Preferences, from the DecoderPro menu
- In the “Connections” pane, ensure that the three entries are as shown here:
- System Manufacturer SPROG DCC
- System Connection SPROG
- Serial port /dev/ttyACM0
(or very similar set of digits – NOT any “Bluetooth” entries!)
Click and reselect the Serial Port, even if it looks correct. - Click the Save button at the bottom left of the pane. You will usually be prompted to Restart DecoderPro to use these preferences.
B. Checking that JMRI DecoderPro is talking to the SPROG
- Start DecoderPro.
In Windows, the installer will have placed an icon on your desktop; start DecoderPro by double-clicking the desktop icon.
On a Mac, the program will have installed in the Applications folder. Open that folder, and find JMRI. Open the JMRI folder and you can double-click the DecoderPro.app entry. To keep DecoderPro available on the desktop, you can drag the DecoderPro.app entry down to the Dock at the bottom of the screen, where it will place a permanent icon that you can click to start.
On Linux it is usual to install JMRI in user “pi”, i.e. /home/pi/JMRI - Once DecoderPro has started, there are indicators to tell you if JMRI has correctly recognized the SPROG connection.
See the bottom of the main window for a set of items like these:
The Green text identifies the connection is recognized correctly
Note the Programmer Status item – you will want to watch this later. - Open the SPROG Console from the SPROG Decoder Programmer menu. You should see: →
The SPROG Console is a very useful user diagnostic view, and also supports selection of various settings.
The text in the top box here shows that the SPROG 3 is connected.
DecoderPro didn’t know the SPROG details, and so sent the “?” command; the SPROG responded with its model and version. - At this point, the computer and the SPROG are communicating correctly, and you can start to work with your locos. If any of these items are not showing the results above, then recheck from the beginning, and if that does not solve it, contact us at sprog@bbmgroup.com for more support.

Defaults
The Preferences selections include a Defaults entry.  Check here that all possible selections are set to the SPROG entry and not Internal.
Some Common questions
My Connection name is not the same as in these pictures.
Defaults are set when you make the connection, but you can change this,
and it also can change with different versions of the software.
This name will also show in the menus, etc. It’s just a name!
I used to connect on Com3 and now that doesn’t appear
There is nothing special about any Com or other serial port identifier.
In Windows, that can change as other devices are added, so select the one that does appear as described above.
Some common error messages
The Programmer Status pane at the bottom of the main window is a very useful indication of what is happening. Check this as you use DecoderPro, and it will indicate many common issues and enable you to correct them easily.
- Computer and SPROG are not talking

Error 306: The Status says DecoderPro sent a command to the SPROG, and it did not respond.
Try closing DecoderPro completely, restarting the SPROG (remove and replace the green plug), and then starting DecoderPro again. If the problem persists, go back and check the settings in sections A, B or C above. - SPROG and loco are not talking

Error 301: Dirty track is the most common issue, but here the connection from the SPROG to the track, the track itself, the loco wheels and pickups, the decoder or the connection from decoder to motor could all be causing this. It could also be a non-DCC loco! - Slow operation, or two copies of the program running

This "programmer in use" message can occur in two situations; if something is being slow and you tried another action, or if there is already a copy of DecoderPro or PanelPro running in another window.
a) If a process is taking a long time, for example if you selected Read All Sheets in the programming pages (don’t do that! Select each tab, and then Read Full Sheet on that tab), or even if the Identify or New Loco is taking time, and you try to do something else, such as Identify once more, the combination of DecoderPro and SPROG are unable to respond, being still busy. A good indication of this is Programmer Status showing “Reading CV …”, and especially if the Programming Mode box shows Paged, which is a very slow mode. Be sure to set that to Direct Bit for the fastest response on all but the very oldest DCC decoders.
b) If you have been using DecoderPro, or PanelPro, and then try to start one of them again, the program can only use the one connection between the software/computer and the USB/SPROG cable, and so can give this error message also.
C. Does DecoderPro respond to basic simple actions
The basic operations that are used throughout programming and running your DCC loco include turning the track power on and off, reading from the loco the current CV (Configuration Variable) settings, writing new settings to the loco and sending operational commands to the loco to run it.
As a simple test, the track power is an easy one to confirm. 
In the top row of items is the Track Power indicator, shown Yellow here with the text “Unknown”.
Click on it and it will cycle through some colors, including Red and Green.
Set it to Green and the Track Power is On; set it to Red and it is now off.
If you cannot get out of Yellow, go back and check the prior diagnostics!
Note: You do not need to set the Track Power during programming; DecoderPro controls it automatically.
D. Quick Start using DecoderPro and your SPROG – “Identifying” your Loco
Once everything is connecting, the first thing you will want to do is work with a loco and its DCC decoder settings. But before you do, doublecheck the diagnostic steps above!
So, start DecoderPro.
The first window that you see is the Roster window, with “Getting Started” instructions
(assuming that you have got all those setups completed, and run through the Startup Wizard, and/or manually set Preferences).
Don’t be tempted to manually enter what you think the decoder is, etc., as DecoderPro can read much of what you need from the decoder itself.
Don’t click “Identify”. DecoderPro uses this action to match a loco/decoder to an already saved Roster entry. You don’t have any of those yet!
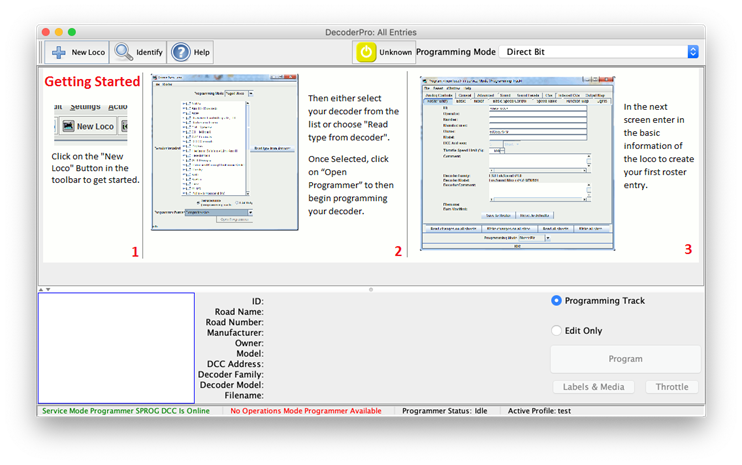
Start by using the “+ New Loco” button, then “Read type from decoder” 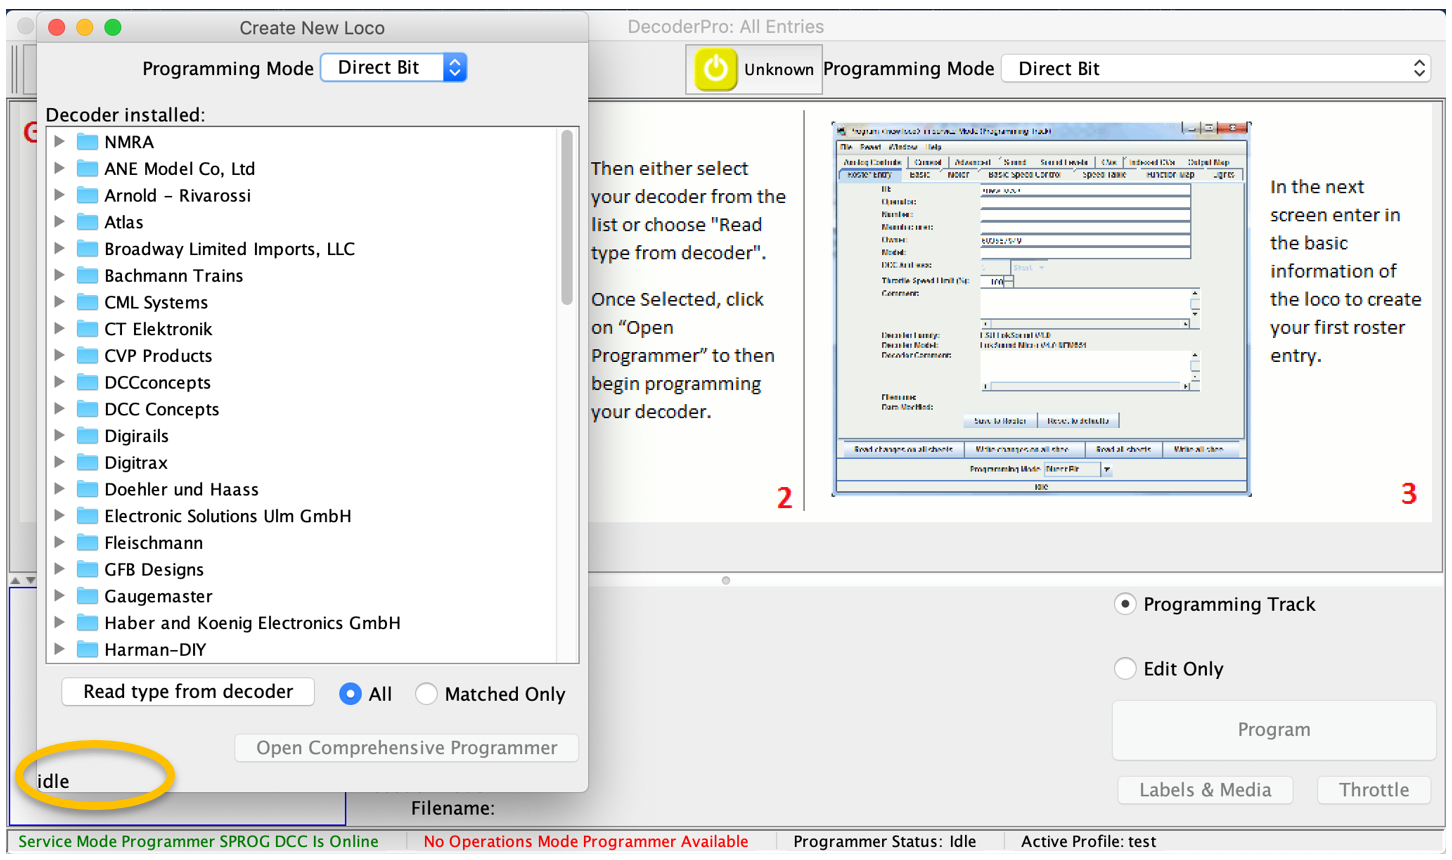
That will send messages to the decoder to identify manufacturer and model or model family. Look at the bottom of the window to see status messages as the CVs are being read. (where it says “idle” in the image above).
For some vendors, an individual model will be selected, whereas for other vendors one model code covers many different decoders,
and you will need to select the appropriate type.
Here for example a Digitrax decoder is installedwhich highlights many models,
and from reading the decoder label or loco documentation it can be possible for the right one to be individually selected.
If not, then all these models share the essential basic functionality, and so you must select the one you think is close (i.e. picking a Diesel or Steam choice, etc. will get you close).
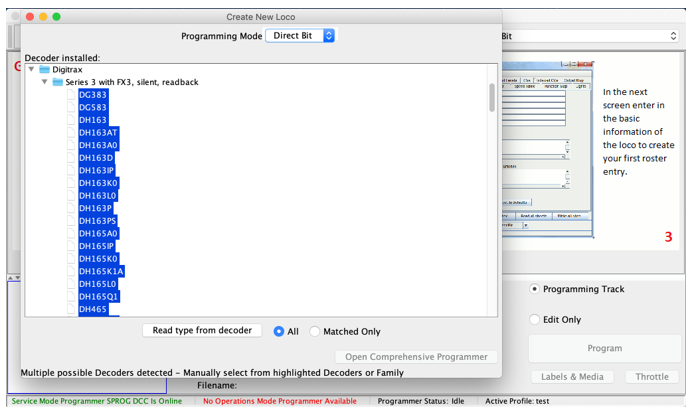
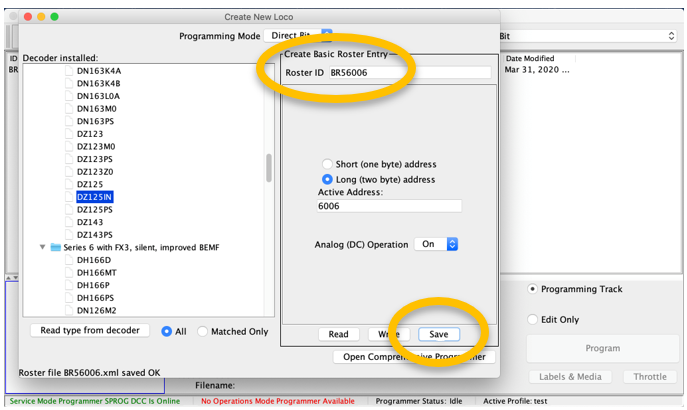
Once an individual decoder model is selected (and you must select only one!),
DecoderPro will also read the current loco address and show that in the right-hand pane.
Give the entry a recognizable name – this will be the roster label - and then Click the Save button.
Don’t use the "Write" button at this point, but click “Open Comprehensive Programmer”
Note: In DecoderPro, “Read” and “Write” are actions related to the decoder in the loco; “Save” is a computer filing action to capture settings in your Roster entries.
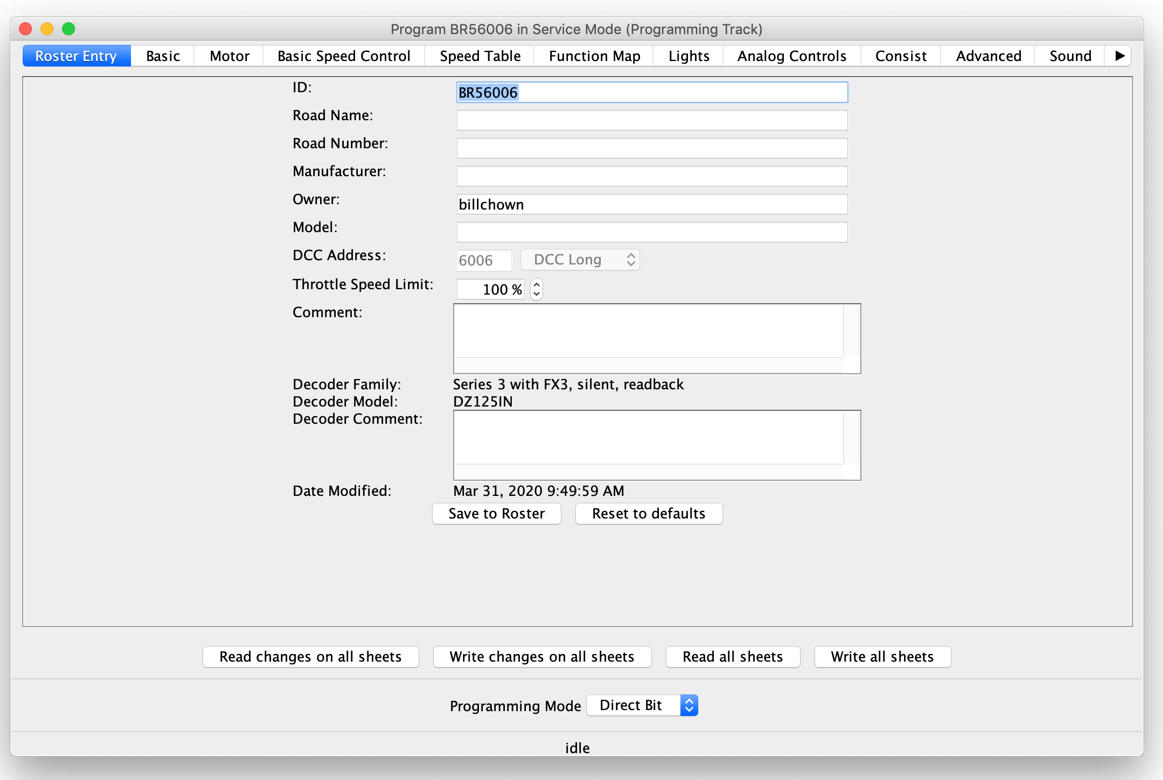
The Programmer view opens to the “Roster Entry” tabbed pane.
On this pane you can add useful reference information about the loco, but the only essential field is that “ID” name at the top, most probably filled in in the previous step.
Across the top you can see that there are numerous other panes, or “Sheets” that you can also access.
E. Quick Start using DecoderPro and your SPROG – Programming your Loco
Click the “Basic” tab at the top, and DecoderPro will open the next most important Sheet, with the address of the loco, and some other important settings.
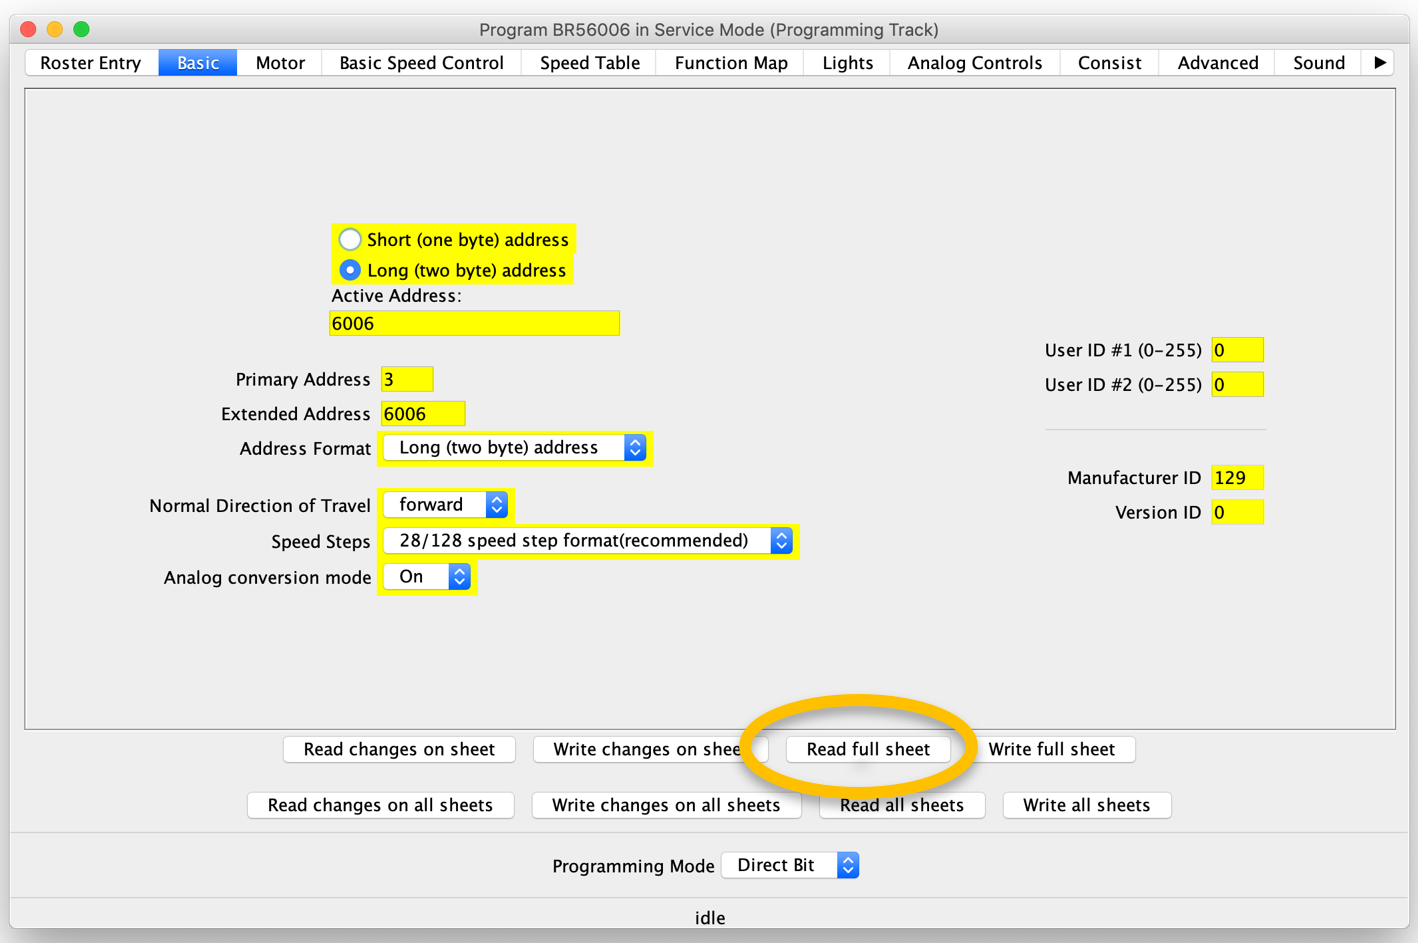
The settings are highlighted in Yellow, showing that the value there is the last saved value, or alternatively the default for that decoder type.
We want to see if these values shown match the loco, by reading from the loco.
To do so, click on “Read full sheet”.
(We do not recommend that you ever use “Read all sheets”, especially with the most recent complex sound decoders,
as it can take a VERY long time, and is often error prone due to poor connections, etc. Instead step through the sheets/tabs one by one reading each one as you go,
or go to the "CVs" tab and read there - will also take a loooong time for the newer sound decoders!)
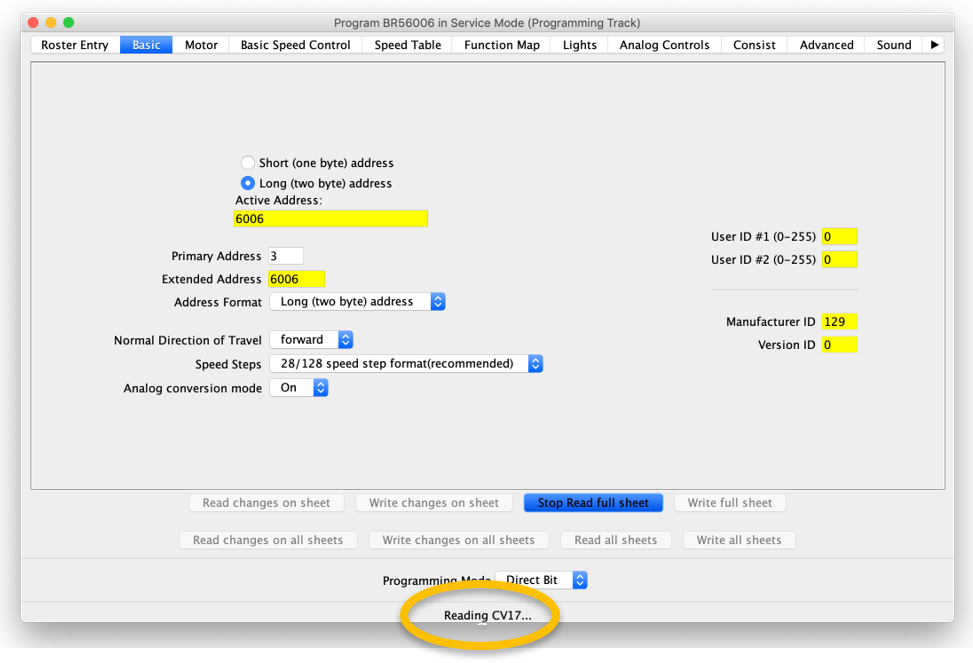
As the Read process takes place, the yellow highlights will be removed, and at the bottom of the screen you can see the actions being taken to read each CV.
If you see red highlighting, this shows that a Read was unsuccessful for a setting.
Try the Read again by either “Read full sheet” or “Read changes on sheet” to try to clear red highlights.
This is now the place to set your desired address in the "Active Address:" field, and set Long (>128) or short (<99) address mode.
Then click "Write changes on sheet" to write these settings to the decoder.
There are additional Sheets for all the settings in a decoder, but to get started you do not need to change any of those. Review them at your leisure!
Go back and review each one later, to see what features your decoder/loco offers, and when – if at all - you want to make adjustments.
For each sheet that you change remember to "Write changes on sheet" to set these new values in the decoder.
Go cautiously. Once you have set up the basic information as above, close this set of programming panes by just closing the window.
You will be prompted to Save your changes,
and that will update the entry in your Roster with all the settings that you have read or changed for this decoder/loco.
This does not Write to the decoder!
Click the “Save and Close” button:
This reference information will be invaluable to you in future! If you later make changes but then don’t like them or experience some form of decoder reset, your saved Roster information can be reloaded and written to the loco.
More on this in some separate notes!
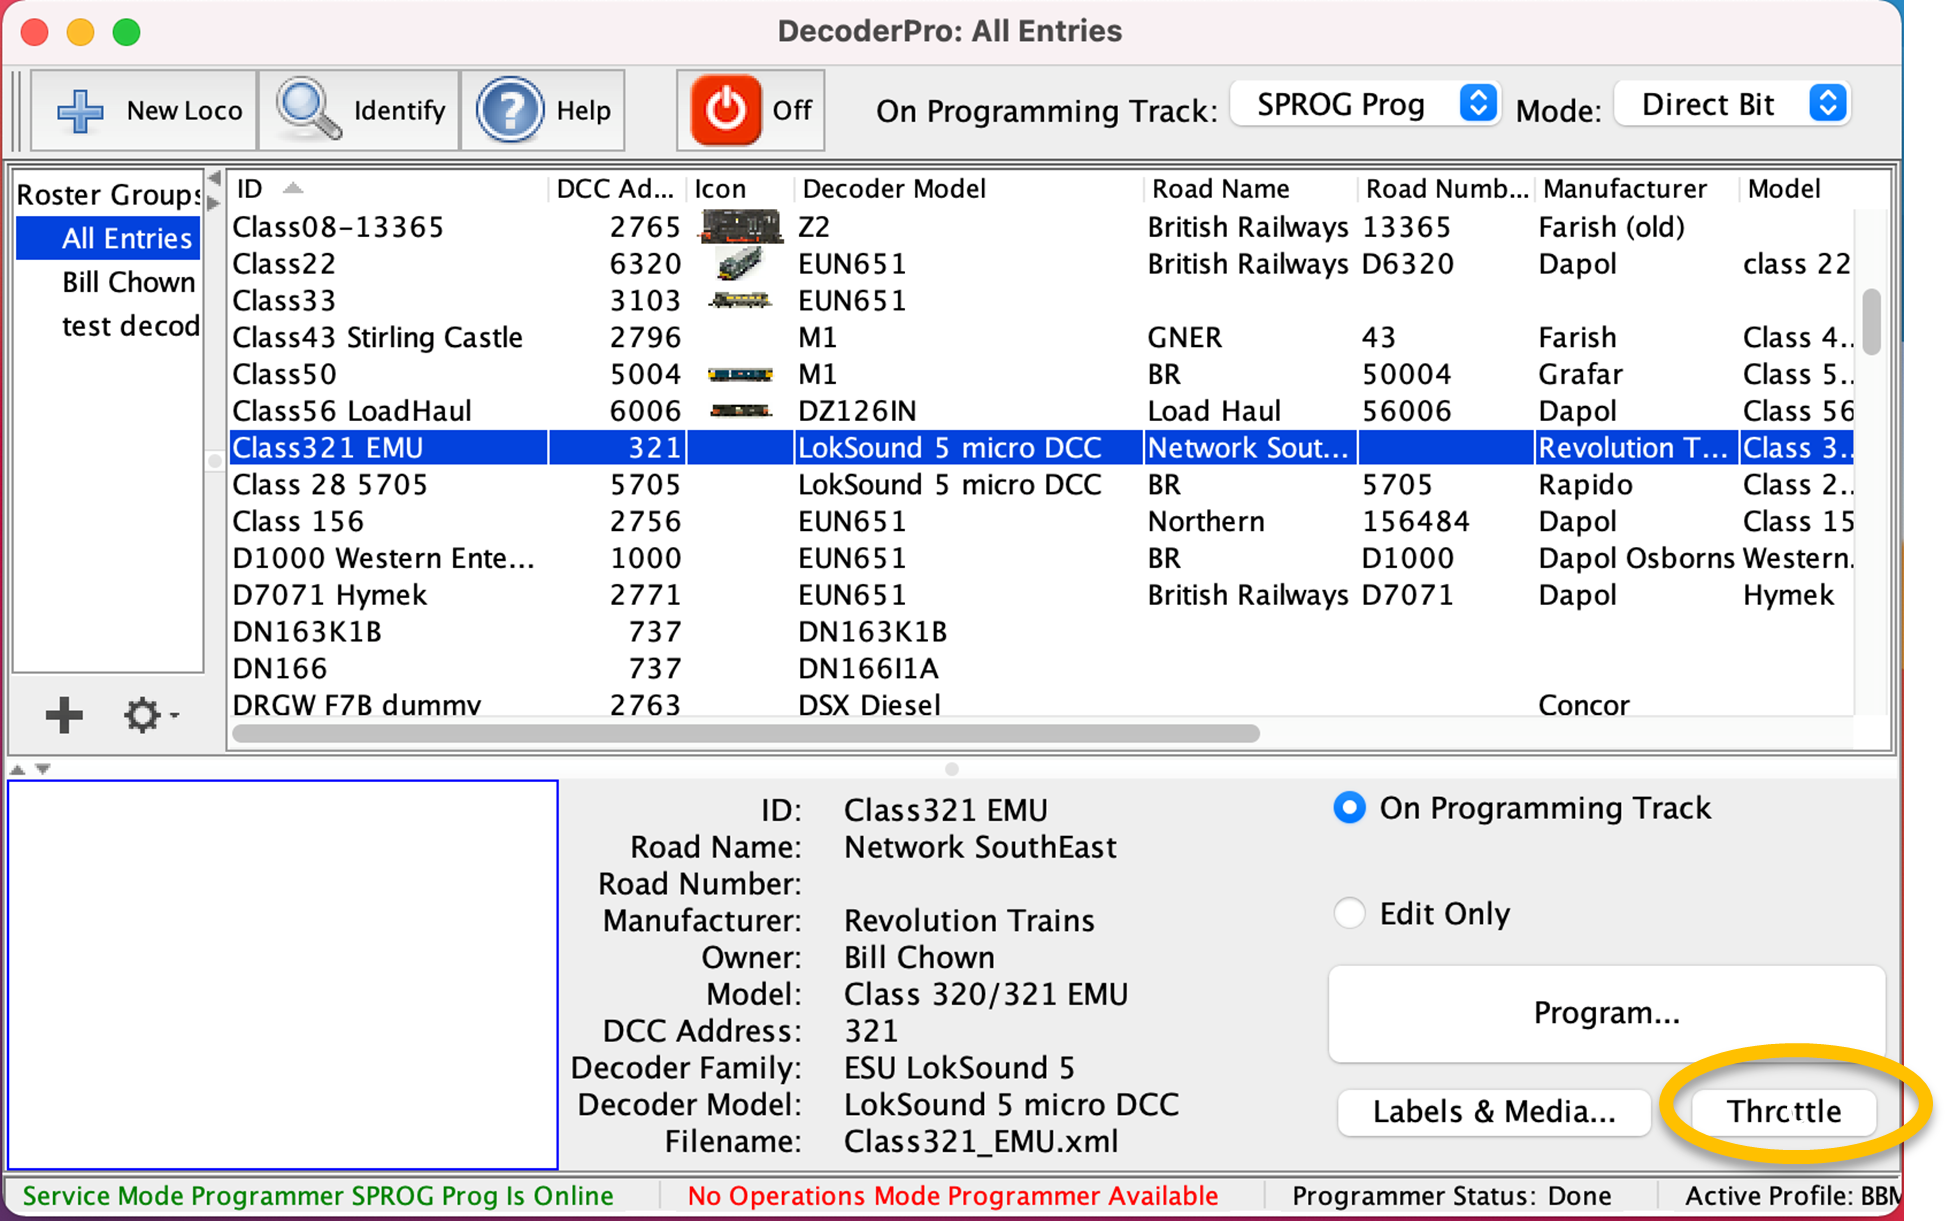
F. Running Your LocoNow that you have got the loco identified, understood which decoder is installed and set up the initial loco information in your Roster, you will want to see it run!
|
|
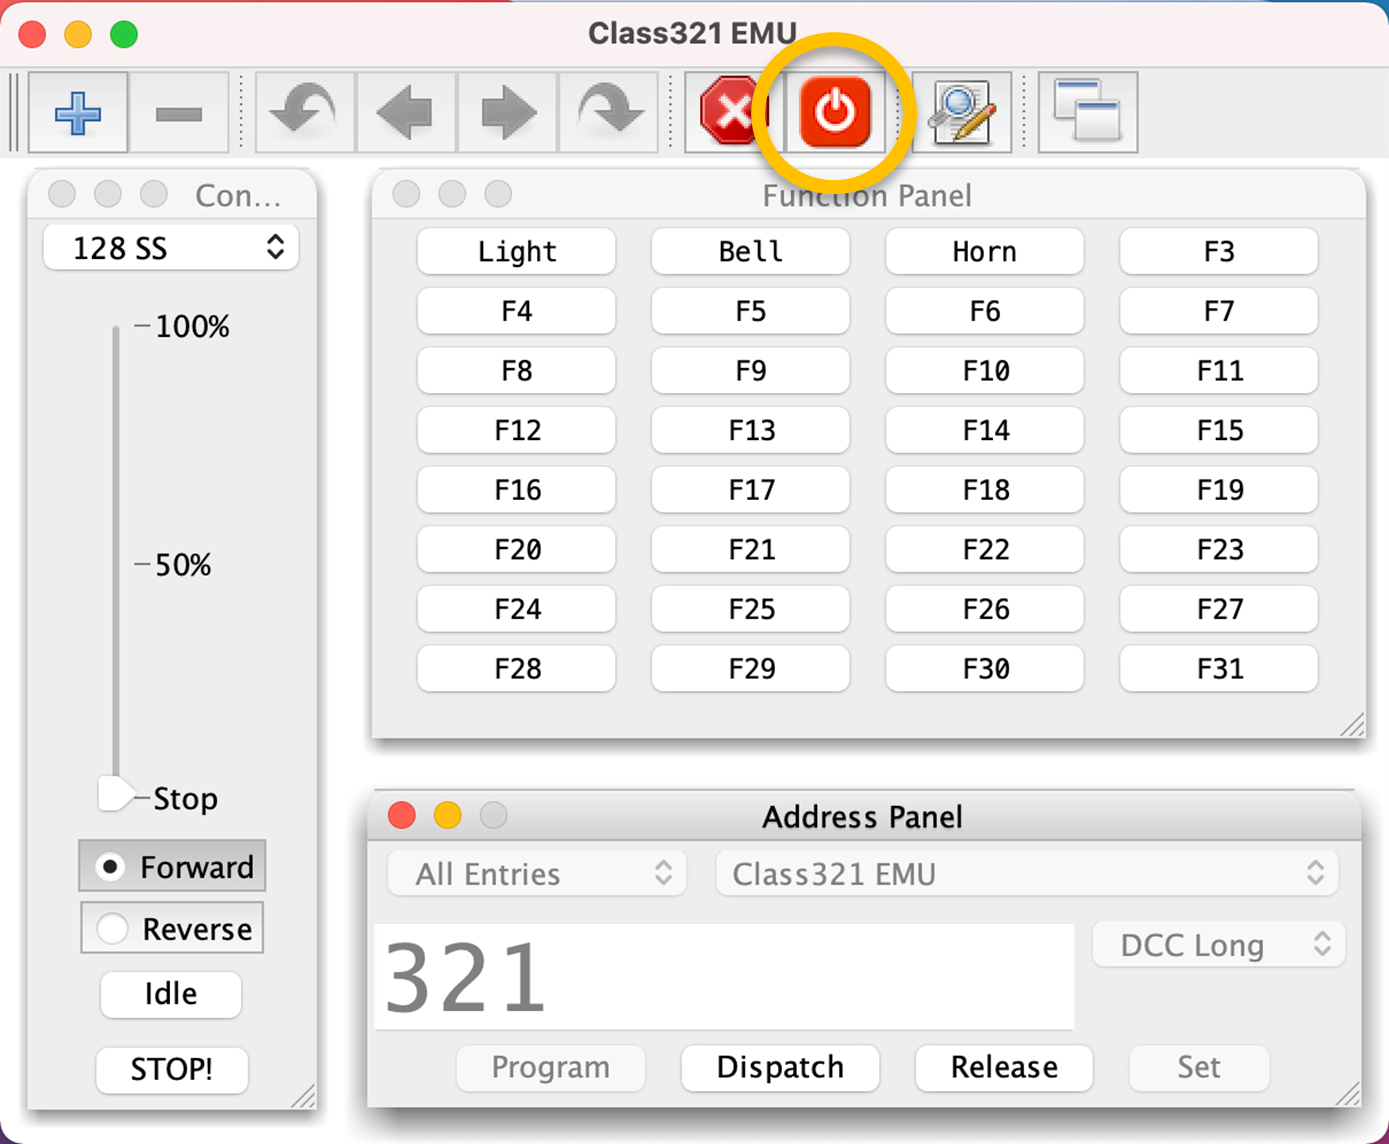
Now select “Throttle” towards the lower right of the window, and a new throttle window will open. |
|
|
| Enjoy your SPROG and JMRI DecoderPro! |
Success? Or not?
If you have succeeded in getting [back to] operation, great! If you saw any discrepancies in these suggestions,
please let me know and I'll keep improving these notes.
However, if you didn't succeed yet, then please feel free to contact me and I'll be happy to talk, Zoom or email and get you going.

 Note: If this fails, no point on going forwards – fix this by going back over the previous diagnostic steps to see why you didn’t get this loco correctly identified.