|
For Windows version 8 and newer, the following procedure will install the drivers for SPROG II. (Not SPROG IIv3 or IIv4)
Windows 8 and newer added a new level of Driver Signature security, which needs to be adjusted to install; please follow the additional instructions below.
Briefly, the process is as follows:
- For Windows 8, 8.1 or 10 and 11, temporarily disable the additional security measures
- Open Device Manager and then plug in your SPROG and connect it to the power supply
- Under "Other Devices", update the drivers for SPROG DECODER PROGRAMMER
- check under "Ports (COM & LPT)" for assigned com port number
When the SPROG is recognized by the computer, the system will attempt to install the appropriate device drivers automatically.
Specific drivers are needed for SPROG to function correctly, and will not normally be found by the automatic routine.
The correct compatible USB drivers for Windows 7, Windows 8 and Windows 10 or 11 are provided on the standard installation CD-ROM in the "X":\USB\ directory,
where X is the drive letter of your CD-ROM drive (usually D).
Using the CD, you should specify the appropriate location during installation, as shown in the example following.
If you have already downloaded the drivers from our website online,
select the uncompressed USB folder that you downloaded at the appropriate point of the instructions below, or follow the direct download link there.
Windows 8, 8.1 and 10 or 11 - Disable Driver Signature Enforcement
Windows 8 and later security prevents the installation of some device drivers, unless you disable that security feature temporarily.
The drivers for your SPROG require that you take this step.
We recommend that you print out this page, and keep it to hand, as you will restart your computer during this procedure.
Printable PDF version (10 pages) of this page
There are slightly different procedures for each version of Windows!
Windows 8: Press Windows Key + I on your keyboard to access the settings "charm bar" and select "Change PC Settings".
On some Windows 8 configurations that may not show the right item; press Windows Key + W, enter "General" in the Search box, and then on the left click on the "General" entry.
Select "General" in the left hand list then scroll the right hand pane down until you can see "Advanced Startup" and click "Restart Now".
Windows 8.1: Press Windows Key + I on your keyboard to access the settings "charm bar" and select "Change PC Settings".
On some Windows 8.1 configurations that may not show the right item;
press Windows Key + W, enter "Update and recovery" in the Search box, and then on the left click on the "Update and recovery" entry.
Select "Update and recovery" in the left hand list, then choose "Recovery".
Scroll the right hand pane down until you can see "Advanced Startup" and click "Restart Now".
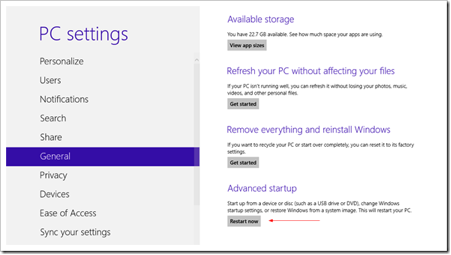
Continue below
Windows 10 or 11: From the Start Menu select Settings, or press Windows Key + I on your keyboard to access the Settings App.
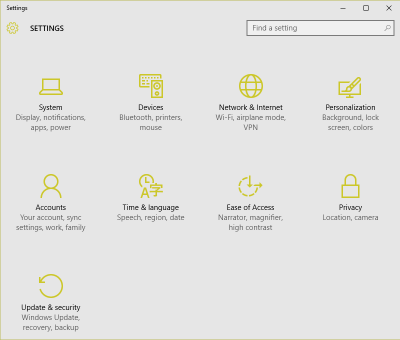
Select "Update and Security" in the left hand list, then choose "Recovery".
In the right hand pane under "Advanced startup" and click "Restart Now".

On some Windows 10 configurations that may not show the right item;
An alternative way to restart is to press Windows Key + R to bring up the Run box. Type shutdown /r /o and hit Enter.
Windows informs you that you are about to be signed off. Click Close, and your PC will restart.
All Windows 8 and later versions
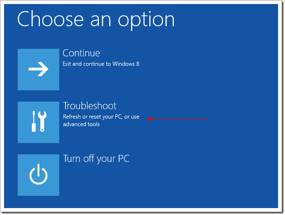
When Windows restarts click "Troubleshoot".
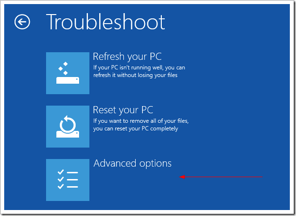
Click "Advanced Options".
Click "Startup Settings"
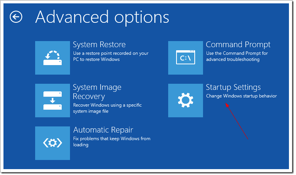
Click "Restart". Windows will restart into the Startup Settings menu.
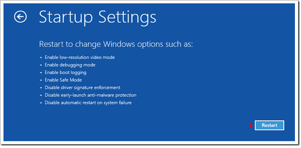
When Windows again restarts,
Press 7 on your keyboard to "Disable Driver Signature Enforcement"
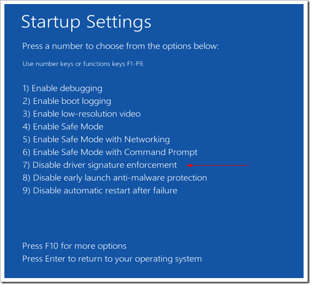
Your PC will reboot. Proceed with the USB Drivers installation as listed below.
Note: The changed settings are needed for driver installation only, and are only temporary. All settings will return to normal next time your computer is restarted.
USB Drivers - Installation
Open Device Manager. Depending upon your edition of Windows, this may be accessed by slightly different paths.
On Windows 8 or 8.1, bring up the Power User Menu with your keyboard by pressing the WIN (Windows) key and the X key together, and select Device Manager.
On Windows 10 or 11, type Device Manager in the "Ask me anything" search box.
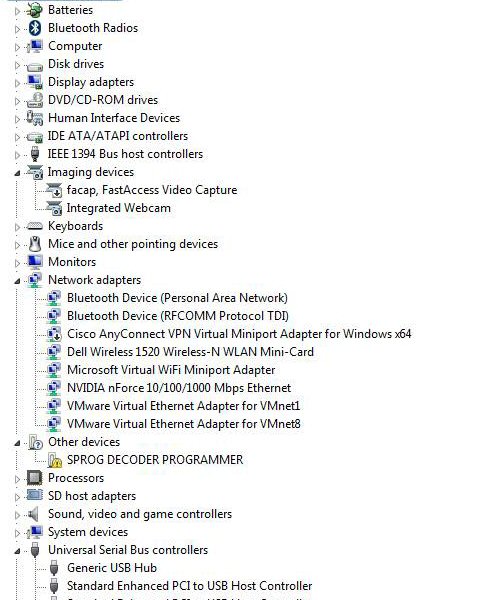
The SPROG DECODER PROGRAMMER will (most likely) appear under "Other Devices"
Point to the SPROG DECODER PROGRAMMER entry and press the Right mouse button.
Select "Update Driver Software", or select Properties, and under the Drivers tab, click "Update Drivers"
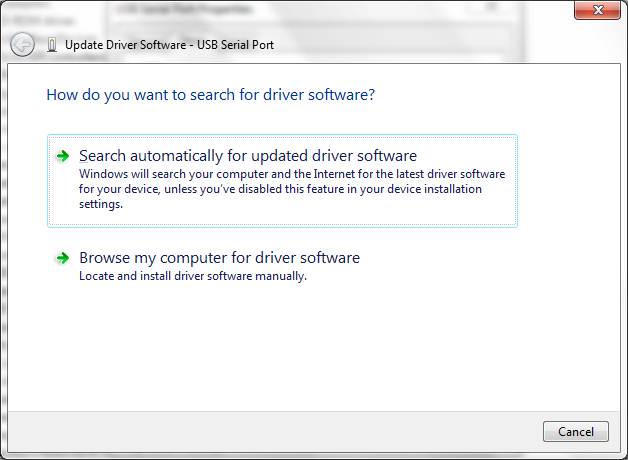
Click "Browse my computer for driver software",
and the window shown below will open.
Click the Browse button to find the drive letter for the CD-ROM supplied with SPROG II.
Be sure to Check the "Include subfolders" box.
|
(If you do not have the CD, click here to
download the USB Windows_2000_XP_Vista_7 package
for the drivers to install.
These are compressed "zip" files and will need to be extracted by Windows, or a third party "zip" program.
To uncompress these files, find them (probably in your "Downloads" folder) using the File Explorer, and then point to the item and double-click.
This will open the compressed zip file and show a single entry with essentially the same name as the compressed file. Do not double-click that;
instead drag it out of this window onto an empty space on the Desktop (background) of your screen, where it will be easy to find in the next step!
You will briefly see a small window telling you that Windows is uncompressing the files.
|

The wizard will take a short time to find and verify the drivers in this location.
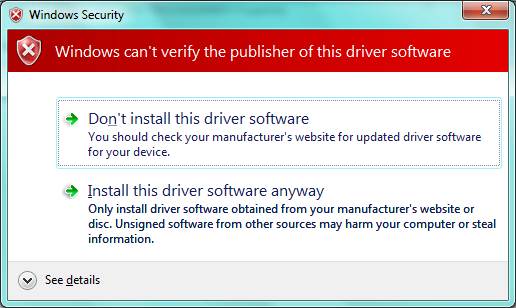
The base drivers are fully compatible with Windows7 and Windows8, 8.1 or 10, and those supplied on the CD are the latest drivers.
To make them SPROG device specific, the .inf files have been custom configured, which surprises Windows, and causes this dialogue to appear.
The drivers we supply are correct and are perfectly safe to use.
Click "Install this driver software anyway".
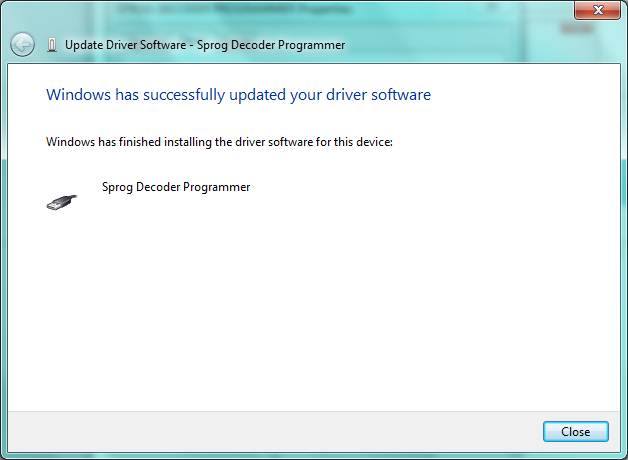
Click "Close".
Now return to the Device Manager,
and the entry will have changed.

Important! Repeat the process, updating the drivers on this entry, and following exactly the same steps.
Do not cancel this next sequence, even though it appears duplicate! There are two levels of driver that have to be installed.
Point to the "USB Serial Port" entry and press the Right mouse button.
Select "Update Driver Software", or select Properties, and under the Drivers tab, click "Update Drivers" and then follow the same sequence of steps as above.
Finally, the installation will complete, and the assigned serial port number will be displayed, see below.
Important! Note this Port number, as it is required when you run DecoderPro the first time.

For more information, please read the documentation in the SPROG II User Guide
or see more at the FAQ page at http://sprog.us.com/faq.html.
Start DecoderPro
The next step is to start DecoderPro, and set preferences for this connection.
 Next an
introduction to DecoderPro. Next an
introduction to DecoderPro.
|


 Next an